How to wire a plug
How to wire a plug – this article is intended to guide you in wiring a plug or rewiring a plug, so that when you have to change a plug at home or work you know how to do it correctly.
In the UK we operate on a 230 volts electricity supply which has the power to kill if it’s not used sensibly. Electrical appliances, circuits, leads, plugs etc. are specially designed to reduce the chances of you receiving an electric shock; but only if they are managed correctly. For that you need to know how to wire a plug correctly.
Whether you are rewiring a plug that is already in use or wiring up a new plug for the first time it is important to get it right.
You may be surprised to learn but there is a very high percentage of British adults who do not know how to wire a plug. We as PAT testers come across literally thousands of badly wired plugs every year – it is our job to make sure plugs are wired correctly.
We don’t all need to know how to manage electrical circuits correctly, that’s why we have electricians but we should understand the basics, like wiring a plug. This guide is intended to help you to wire a plug correctly.
If you have faulty plugs and are worried about repairing them, then don’t do it, get in touch and we’ll come to the rescue!
Seriously, you’ll struggle to find this offer anywhere else – if you need a UK plug wiring or have a forgeign plug you need to replace with a British one, and don’t want to do it yourself, drop us an email at info@draelectricals.co.uk and we will come to you (when we’re passing, but we’ll let you know when that will be), providing you’re located in our area.
Being able to wire a plug correctly is an essential skill of every PAT tester.
How to Wire a Plug – Step by Step guide
Knowing how to wire a plug is a good skill to have, especially as UK plug wiring is so important. At some point in life, with all the electrical appliances we have you may need to know how to wire a plug. For example, if you cut the cable in your hair dryer, you can then cut the cable back past the cut and rewire the plug back on to the cable – that’s far cheaper than buying a new hair dryer!
Rewiring a plug is a fiddly job, but fairly straight forward if you follow the instructions.
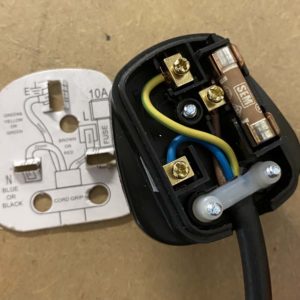
If you buy a new plug it’ll have a handy carboard wiring diagram attached to it. This little bit of card is excellent – it shows you what length to cut the wires and where to put them, just make sure you take it off before plugging it in – it shows you exactly how to wire a plug. In fact this little cardboard diagrams are quite hard to get hold of and we remove them from extension leads every day! Charity shops for example, need them on plugs of appliances they are selling. We remove them from plugs and recycle them by selling them on batches on eBay – get yours here.
To wire your new plug you will need a small screwdriver and some wire cutters, and a steady hand.
This page breaks down wiring a plug into 5 easy steps:
- Preparing the wires
- Cutting the wires to the right length
- Opening the plug and preparing the terminals
- Putting the wires into the terminals
- Sealing the plug back up
There’s also a handy video below, to show you how to wire a plug yourself.
How to wire a plug yourself video
Rewiring a plug, how to do it
Wiring a plug seems to cause all kinds of confusion, which it shouldn’t really as it’s not that complicated, if perhaps a little bit fiddly. When we’re working we actually come across people quite often who jest us with things like – “what’s the point of PAT Testing; anyone can wire a plug“, only for us later to find an incorrectly wired plug, done by that very same person!
But don’t let that put you off. If you follow these simple steps you will be able to wire your plugs without too much hassle.
To help you, all new plugs come with a handy cardboard wiring diagram, placed over the pins. This should be removed to use the plug, but as a guide for wiring it is perfect and includes everything you need from the which holes to put the wires in, to how long to cut them. You can’t go wrong.
In order to be able to rewire your plug; you’re going to need 3 tools –
- a cross-head screwdriver that fits the screws on the outside;
- a flat head screwdriver that fits the screws on the inside and
- some side cutters or wire strippers
How to wire a plug step by step guide
How to wire a plug – Step 1
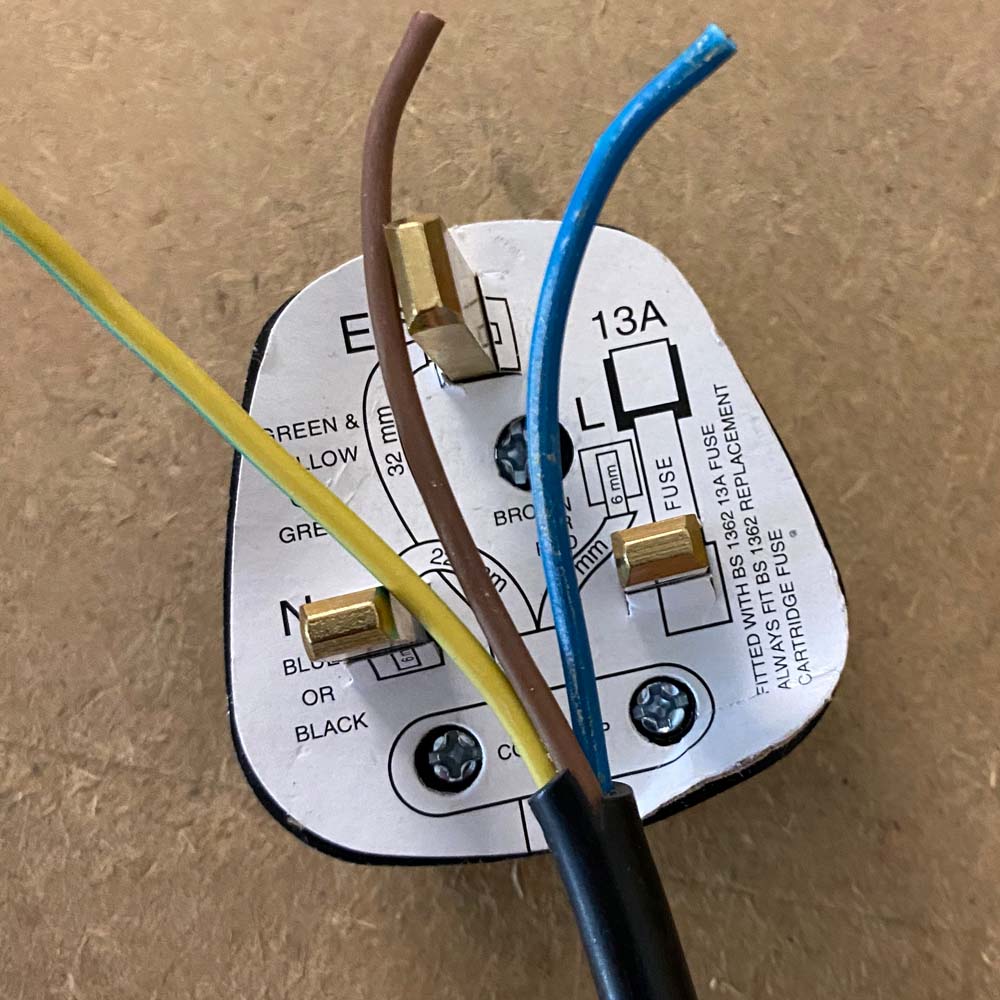
Step 1: The first step of rewiring a plug is to cut back the outer sheath (black) of the flexible cable, to get access to the coloured wires underneath; give yourself plenty of wire to work with. Line them up on the diagram of the plug so you can see the lengths to cut.
There are three coloured wires inside the cable; cable colours are blue for neutral, brown for live and yellow for earth; yellow and green to be precise.
- The blue wire connects to the neutral terminal, to the bottom left
- The brown wire connects to the live terminal, to the bottom right attached to the fuse
- The yellow and green is the earth wire, which connects to the earth terminal at the top
How to wire a plug – Step 2
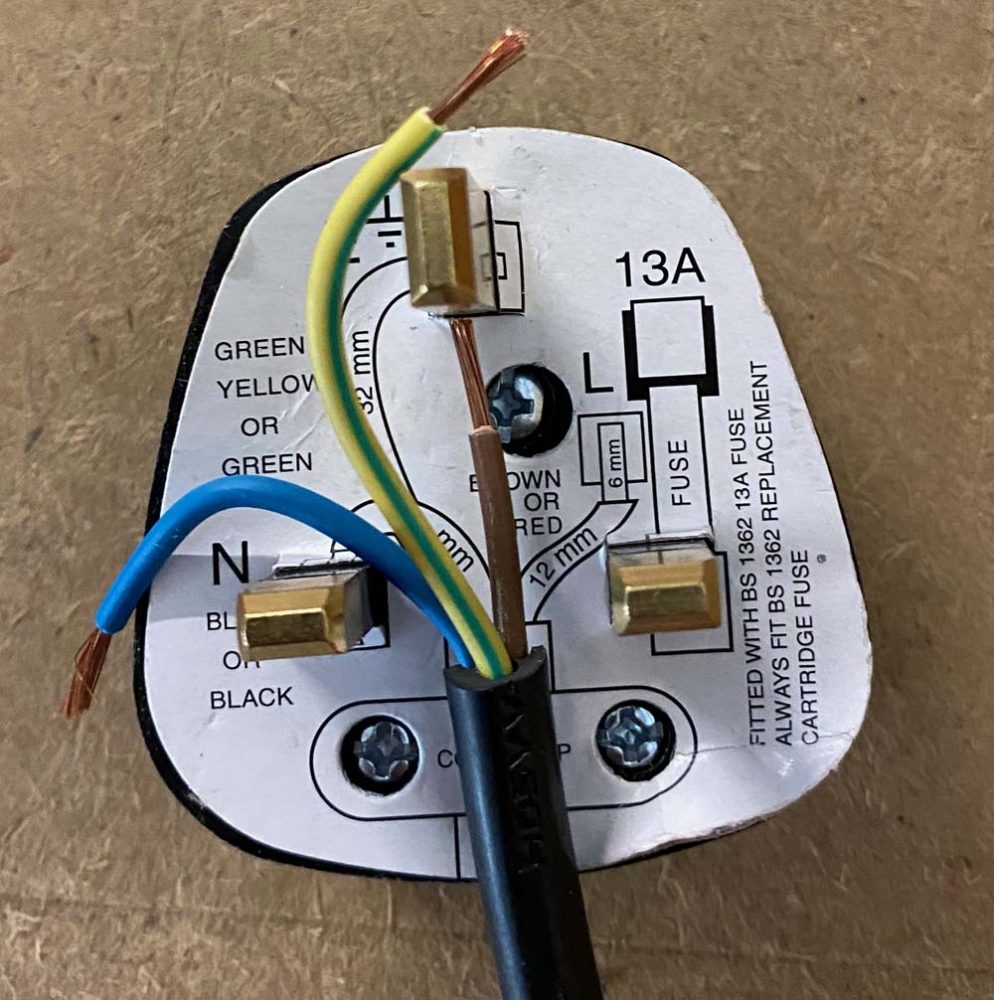
Step 2: Now you need to cut the wires down to size; doing each one in turn line it up on the diagram and mark the length, then using the snips carefully cut off the outer insulation leaving the copper bare wire exposed. You don’t need much bare wire exposed, about 6mm should be sufficient.
How to wire a plug – Step 3
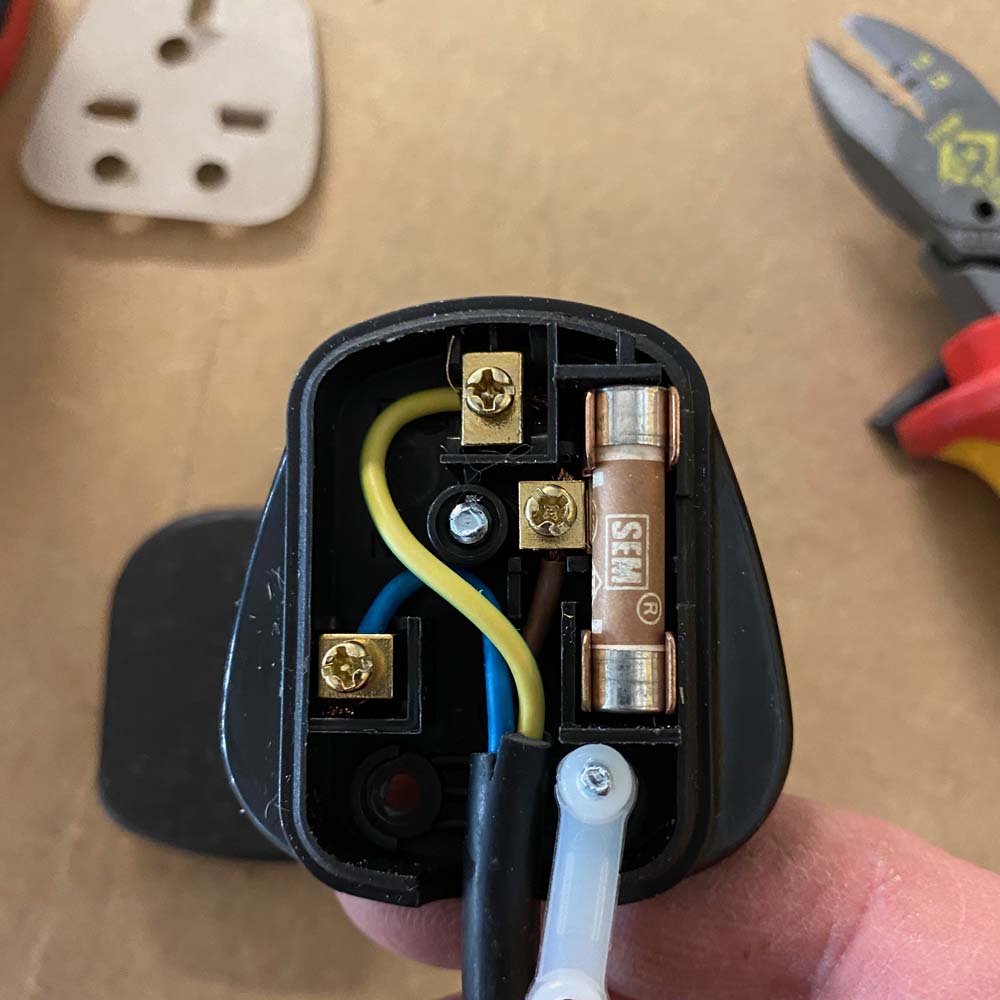
Step 3: Now you need to open the new plug using your screwdriver and the central screw. Unscrew it to open the plug and put the plug top to one side. Using your smaller screwdriver unscrew but don’t remove the small terminal screws of the pins.
Open up the cable grip too; totally remove one screw, and loosen the other so you can turn the grip to a right angle from its standard position.
How to wire a plug – nearly finished
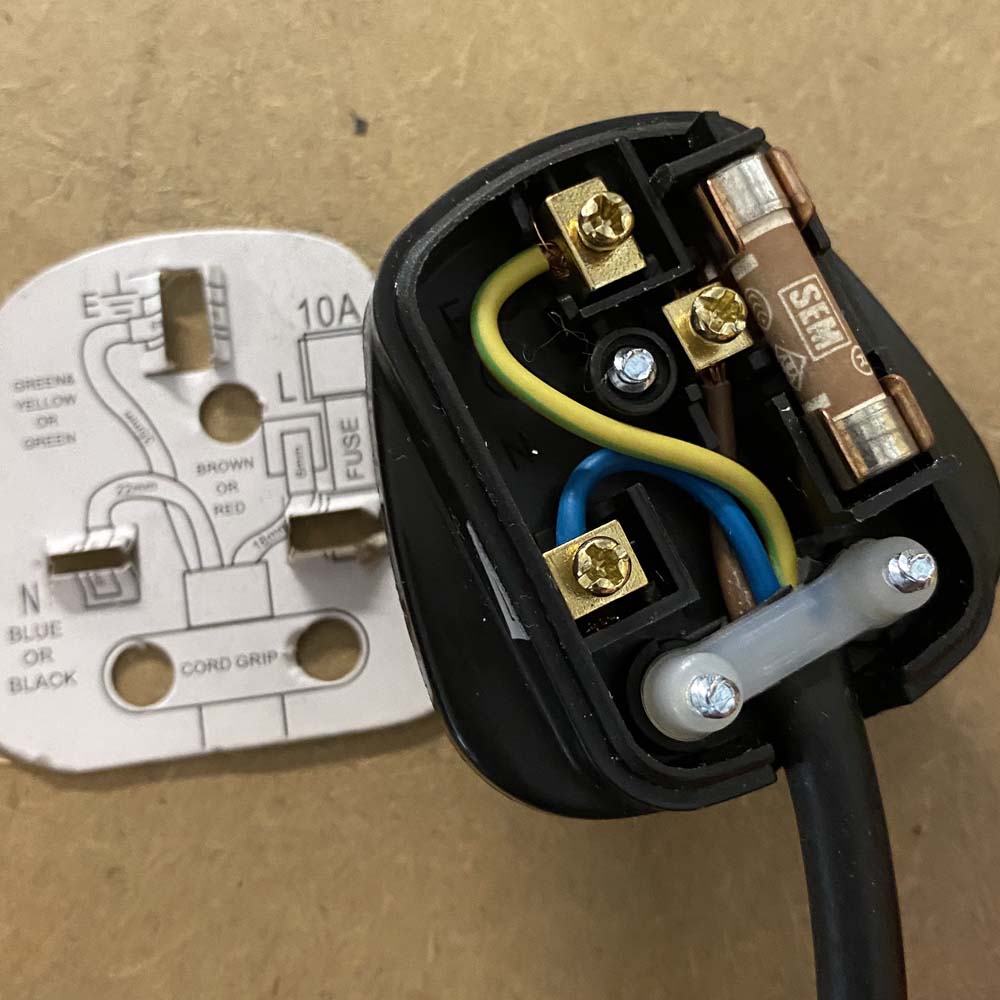
Step 4: Now we’re making progress rewiring the plug – next you need to put each wire into the appropriate terminal pin, and tighten with the screw to secure the copper in place. Start with the live (brown), then the neutral (blue), and finally the green and yellow (earth). When each is secure, position it in the indents of the plug top so it is neat and tidy.
Then turn the cable grip back to its normal position, and put the screw back in place; tightening both to secure the flexible cable in place.
Finally, before you close the plug make sure the fuse is correct. The image shows a standard 13 amp fuse because that is what came with the plug, but you need to confirm that is sufficient for the appliance before closing up. Check this article on fuse ratings to be sure.
How to wire a plug – the last bit
Step 5: The final and easiest part is to put the plug top back on, and secure it in place with the screw. You now have a fully wired plug, done correctly and now you know how to wire a plug.
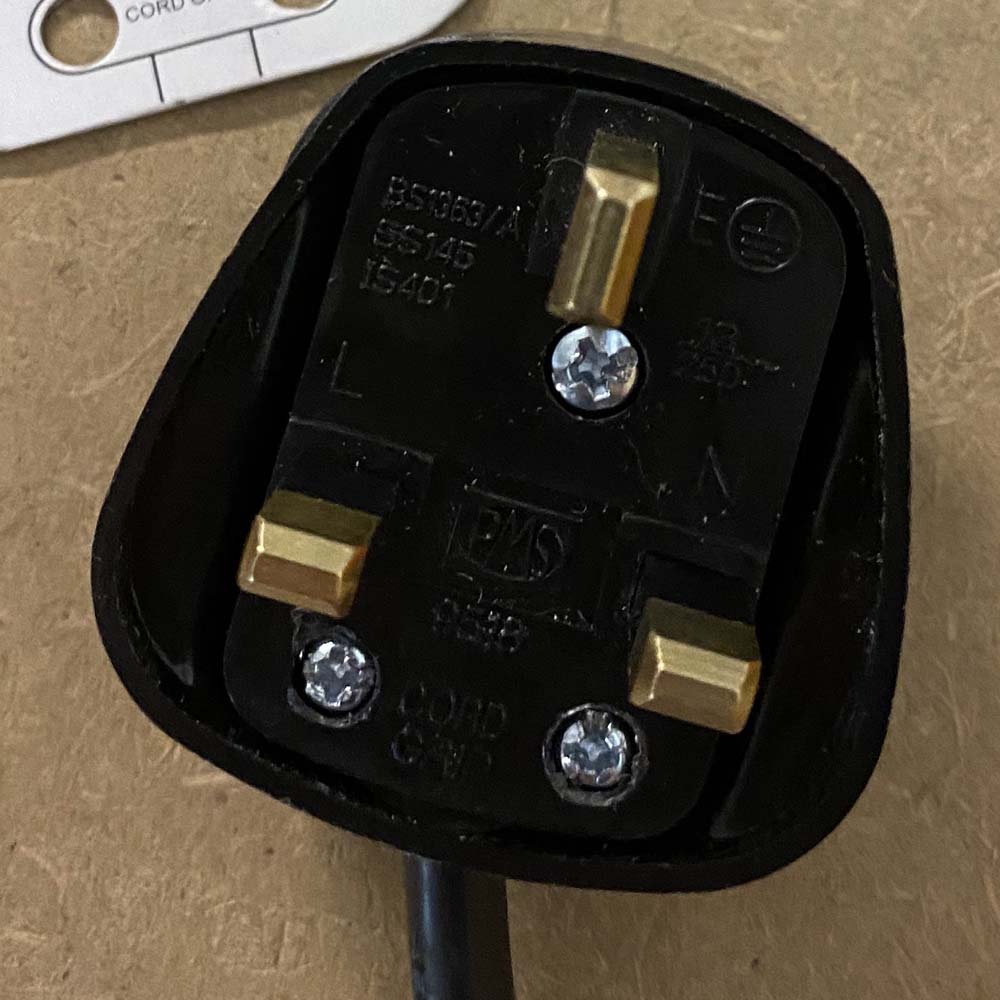
Wiring a plug yourself can be a daunting experience, we understand that, you don’t have to do it yourself. Get in touch with us and we’ll come to do it for you.
Contact us to arrange your electrical testing
We actually come across a lot of plugs that have been wired incorrectly by people who claim to know what they’re doing, and it is often those people putting themselves at risk. Rewiring a plug is a skill that shouldn’t be undervalued.
Everyone should understand the basics of a correctly wired 3-pin plug, and also be able to recognise any errors. If you don’t then this guide is for you.
Note: If the plug you are wiring only has 2 wires; live and neutral (brown and blue) then all you do is not do the part that refers to the earth wire.
This is an image of an incorrectly wired plug to show you how easy it is to get it wrong.
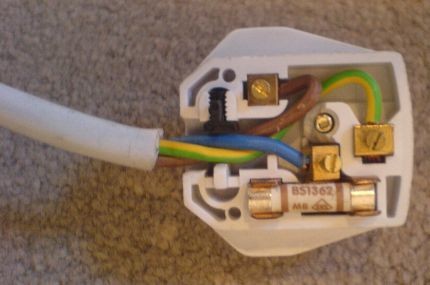
What’s wrong with the wiring in this plug?
To the untrained eye it may not be obvious and you can be forgiven for missing the issues, for now.
The wiring is reversed – The main issue here is the Live (brown) and the Neutral (Blue) wires are wired incorrectly; they should be opposite to what they are.
The cable clamp is incorrect – The other issue with this picture is the (white) cable has not been clamped correctly – the white outer sheath should come into the plug casing and be firmly fixed in place by the clamp (the black part which is above the wires in this image).
The wires are cut to the wrong length – To be fully correct, the coloured wires should have been cut at better lengths so that the white covering is fully into the plug before it is secured. Most plugs actually have a cable grip that screws across the main outer insulation sheath.
An electricity cable (or flex) used for connecting an electrical appliance to the plug will usually contain two or three wires wrapped in coloured insulation. These are commonly called “two core“, or “three core” cables; not to be confused with “twin and earth” which is the term used for mains wiring cables, although there is no real reason why the terms can’t be interlinked.
Each coloured cable has copper wires inside because copper is a good conductor of electricity. The outer layer (what we tend to refer to as the “wire” is flexible plastic, as plastic provides good insulation; this wire is commonly referred to as the “flex“; short for the “flexible cable“.
The inner wires of the flex are are colour coded:
- The Blue wire is Neutral
- The Brown wire is Live
- The Green and Yellow striped wire is Earth
The plug itself has 5 main features:
- The plug ‘top‘ is made of tough plastic or strong rubber as these are both good for insulation and thus protect the user
- The plug has 3 pins, made from brass, which is a good conductor, and strong
- The plug has a fuse between the live terminal and live pin – If too much current flows from the electricity supply into the plug the fuse breaks the circuit
- The cable is secured in the plug by a cable grip
Top Tip from an expert: If the cable grip has a screw either side; remove one completely, and the other just enough so you can turn the grip 90 degrees (out of the way) – this will reduce the risk of losing the screws and will speed up the job for you, as it’ll be much easier to screw it all back together.
A bit more info
Wiring a plug is an easy process, sometimes fiddly though. You’ll need a screwdriver and perhaps a set of ‘snips’:
Let’s presume for this exercise that the wires have been prepared so we can use this easy is easy to remember saying:
Blue goes left, brown goes right and striped goes to the top
If you see the second letter of each wire relates to where it goes in the plug
bLue – left
bRown – right
sTriped – (straight to the) top
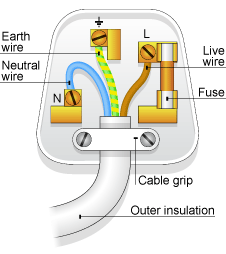
This image shows how to wire a plug correctly
Whilst it is handy to know how to wire a plug it’s not something you’re going to need to worry about if you use us for your portable appliance testing, as we’ll do it for you. Even if you don’t use us for PAT, if you need a plug rewiring, we may be able to come do it for you.
Get in touch for a PAT testing quote or to discuss your needs.
UK Plug Wiring
Now, lets delve deeper into UK plug wiring and why it is what it is
The standard UK plug is like no other in the world; it has three chunky, metal pins when most others just have two, and the plug in the main is bigger than elsewhere in the world – how can they get their electricity on such a smaller unit than us?
Well, in fact, the UK plug may be bigger but it is designed that way on purpose to be safer than any other plug in the world.
It’s bigger than in other countries on purpose; the designer didn’t do that to annoy or frustrate – its size makes it safer, how?
The pins: The design of the UK plug is intended to massively reduce the risk of an accidental electric shock; for example, half of each of the live and neutral pins is covered in insulation – the bit you might touch when plugging in or pulling a plug out.
The socket it plugs in to: It is very easy to access the mains electric in other countries by forcing a pointy metal object into the holes, but in the UK it actually takes a tremendous amount of skill and know-how to do the same. The UK plug is designed so that the ‘earth pin’ (the one at the top on its own) is slightly longer than the other two, so that it can ‘unlock’ the socket. Until that earth pin is pushed in the live and neutral don’t have connection to their terminals, meaning by this point the earth (safety) grounding is already connected, making it safe for the user, so if they accidentally touch the other pins, they will be protected by the earth connection and the insulation. Some old plugs actually don’t have insulation, although there are not many about now as they’ve not been manufactured since 1984! If you come across one of these it definitely needs changing.
The fuse inside: Fuses have been in UK plugs since World War 2; if there is an unexpected electrical surge, the fuse in the plug will blow cutting off the electricity supply. This prevents fires, electric shock and other accidents. The fuse is intended to protect the cable feeding the appliance. The benefit of a fuse is it makes a plug (or even appliance) very easy to repair – in most cases, when an appliance stops working, checking to see if the fuse has blown should be the first port of call.
The Plug wiring: Let’s not forget the wiring inside the plug itself. The wiring has been very cleverly designed; if the cable is pulled too hard, and the wiring frays, it’s the live and neutral wires that disconnect first, whilst the earth wire (the one that prevents us getting a shock) is the last to disconnect.
It is without doubt that UK plug wiring, the UK plug is a brilliant design, and does keep millions of British users safe every day.
However, it is important that these users ensure that..
- The plug is wired up correctly & secure
- The fuse in it is correct
- The plug is not damaged in any way
And it is not on the floor upturned, as that really hurts if you stand on it!
It’s a truly brilliant design. The only caveat is that, as with Lego, the rugged, bottom-heavy design of a U.K. plug makes it an almost scientifically perfect caltrop.

